- ArtMinds wooden box base (can be purchased here.)
- Modpodge - Gloss-Luster
- Rub and Buff - Grecian Gold
- Paint brushes
- Arcylic paints of your choice
- Pattern paper of your choice
- Water
- Modpodge Clear acrylic Sealer
- Paper trimmer
- Scissors
- Exacto Knife
- Measuring tape
- Clear tape
Showing posts with label Tutorial. Show all posts
July 12, 2015
Jewelry Box - Mod podged
March 10, 2015
Reference Binder
- All the paper printouts, tip sheets, sketches and other reference material, which is often used for crafting but not organized.
- Keep a track of all the growing stash and maintain a reference of the following
- Stamps
- Dies
- Punches
FEW USES OF THE BINDER
- Easiest way to look up for stamps or other stash that you need for a project.
- A great reference to keep track of all the stamps, dies, punches and other stash that you own. (as we may not remember a stamp set that is not so often used, bought a couple of years ago)
- Details about all the stamp sets you own is preserved.
- All the lookup information that you need for crafting purposes, will be in a single home.
- No more loosing important reference documents or helpful information.
- No more rumbling all your shelves and drawers for finding the right stamp set
HOW TO MAKE THE REFERENCE BINDER
- 3 Ring Reference Binder
- Page dividers
- Labels
- All the paper printouts to organize and file
- Page protectors (Optional)
- 3 hole paper punch (Optional)
- Colour pens and stickers (Optional)
Below are the steps for making this binder.
Step 1. You could personalize the Reference binder front with a decorated pattern paper or a graphic printout of your choice.. This step is optional. Below is an image of how I personalized my binder, with white heat embossing and white gel pen.
- Stamps
- Dies / Punches
- Tips
- Sketches
- Tutorials
- Prepare a PDF/ word document with all the images of stamps that you have in your stash.
- You could include digital stamps that you own as well.
- In case you have some miscellaneous stamps that you cannot find a reference image of, or rubber stamps, you could stamp them directly onto an A4 paper and file them.
- Take printouts of the word document that you had prepared and file them as shown below, into your page protectors.
- Prepare a PDF/ Word document with images of all the dies that you own.
- Along with dies you could also file paper punches together.
- Take printouts of the word documents that you has prepared and file them into the page protectors.
- In case you own paper punches, then you could punch out some samples from colour papers. You could then glue these paper punches onto A4 sheets and file them along as well. (image shown below)
- At times you come across some creative ways to use specific stamp sets that you own, which can be a very helpful reference document to save.
- Also, if you own any PTI stamps, then you could download and save the tip sheets that they share online for the corresponding stamp sets.
- All the possible combinations for a layering stamps or sentiment stamp sets can also be saved.
- All the above information can be created into a word/ PDF document. Later print all the pages and file them into the page protectors.
- A Sample tip sheet that I have filed is shown below.
- All those interesting sketches that you find online, or all the scraps of hand drawn sketches that you have can be filed under this category
- Certain websites/ blogs share sketches for free, which can be downloaded and saved.
- All the above materials can be printed out and filed under this category for reference.
- Below image shows all the sketches that I have saved from CASE This sketch blog.
- Any graphic design tips/ tricks that you find helpful can be saved and filed under this category.
- Standard card sizes, shapes, templates can be saved under this category as well
January 26, 2015
Easy Colour Swatch Tutorial
Making the Colour Swatch
Step 4. Once all the swatches are ready, then punch holes to a corner of the swatches in batches,
Step 5. Arrange all the swatches colour wise / make wise, as per your interest. Slip through the binder ring to secure them all in place together.
The handy colour swatch is ready-to-use !
Tip- Whenever you buy a new stamp pad, create a swatch and slip it through the binder ring into appropriate position. So easy to maintain!
March 26, 2013
1-2-3 Butterflies
Today it's the 50th Challenge @ {PIN}spirational Challenges and This will be my last card with the PINspirational DT. I will miss being a part of this DT. Deanne, you are such a wonderful co-ordinator.
so here is the card for today.
And this card is inspired from this week's super cute pinspirational pic.
I am also submitting my card for the CFC - Challenge 95 which asks up to create a clean and simple project with no stamps.
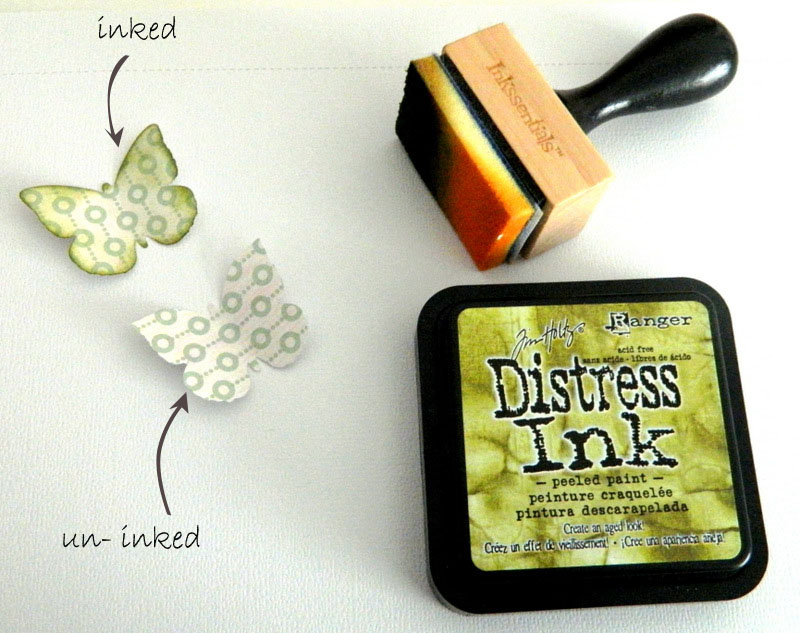
Next I inked the edges of the butterfly with an olive green distress ink, using my distress ink tool. the difference between the original and the inked butterfly is shown below.
Then I have cut and scored a white card stock for the base of my card (5.5" x 4.5 "). Also I have scored two lines at a quarter inch at the two ends of the card as shown, to add some interest.
I have also cut out a small white card stock, distress inked its edges and then adhered the butterflies using dimensional adhesives.
I then adhered the circle that I had cut out and tied a good length of brown twine around my card as shown below
so here is the card for today.
And this card is inspired from this week's super cute pinspirational pic.
Now you too can join the fun here @ {PIN}spirational Challenge # 50. Wow !! It's the 50th Challenge.
How I made this card?
I have received a few requests from my friends and followers, about how I make cards. So here goes a photo tutorial for the same - my first attempt.
First, I have selected a certain pattern papers and then punched out a few butterflies using my butterfly punch. The punched butterflies and the punch that I have used are shown below.
Next I inked the edges of the butterfly with an olive green distress ink, using my distress ink tool. the difference between the original and the inked butterfly is shown below.
Then I have cut and scored a white card stock for the base of my card (5.5" x 4.5 "). Also I have scored two lines at a quarter inch at the two ends of the card as shown, to add some interest.
Then I have used my Martha Stewart's circle cutter to cut out a 3.75" circle from a beige card stock.
I have also cut out a small white card stock, distress inked its edges and then adhered the butterflies using dimensional adhesives.
I then adhered the circle that I had cut out and tied a good length of brown twine around my card as shown below
I then had to assemble the butterflies using dimensional adhesives over it to get my card.
Simple isn't it? Hope you like my card. Your opinion about the card matters and a feedback about the tutorial is most welcome. Thank you.
Subscribe to:
Posts (Atom)