April 3, 2016

I've moved! Blog relocation announcement

IMPORTANT!!

Attention dear friends and readers, I'm moving out!

I've been working like a Trojan for the last couple of weeks, on the (not-so-secret-any-more) website that will be now a dwelling place for Love For Art in Many Forms, which will now named after me. 

>>>IT'S HERE!!<<<


In other words, I switched to a Wordpress website (may be soon a self-hosted website), which means no more ranting over blogger issues and limitations! I'm looking forward to providing you with a more reliable and enriched service, while at the same time I'm given the tools to make my content more interesting and pleasing for the eye.

Now, the important part is that the move means no more Google Friend Connect.

There's a number of means through which you can subscribe to my blog instead, including RSS (also via email), Networked Blogs & Twitter. Whatever your preferences, I sincerely hope that you will make it there and make yourself at home! :)

I can't wait to find out what you think. In case of any suggestions or concerns, please shoot me an email or leave a message and I will work it out for you. 
post signature

February 10, 2016

Bright Floral Backdrop

Hi all. It's been a long time that I had posted something here. I have an announcement to make - 'I'm expecting a baby'. Yes !! That kept me tired for the last few months. I was busy planning, preparing check lists and all. So I couldn't create anything for sometime.
However, I got a chance to work on something colourful, creative and challenging for a couple of weeks. We had to plan for a gender neutral baby shower decor and I obviously insisted that the decor be DIY. Today I want to share with you the floral backdrop that I had made for my baby shower.

Below is the whole setting which is about 12 feet wide and 5 feet high.

(Click on the image below to view full size photo)


Challenge
I knew I wanted a floral back drop which is quite bright in color, since there were several restrictions to not tape anything on the walls at the function hall and only hooks which were already present could be used to hang any decor. Also the main wall had 3 large windows over which inevitably should be part of the backdrop.

  How I made it
I had to make some 80 flowers, 50 leaves and several lose petals to make this back drop. I had used the following tutorial @AshandCrafts to make all the flowers required. This tutorial has all the steps, in detail, required for making flowers. For leaves I have used freehand drawn templates. I also used several other petals of different shapes and sizes, which are freehand drawn too. I had scored leaves to add dimension, after they were cut in different sizes and shapes.

I then assembled all the flowers on large cardboard pieces (same as packing boxes), which were cut in the shape of the arch and then hung to the hooks and windows with the help of a balloon ribbon. 

Materials Used
  1. Glue Gun 
  2. Large Cardboard pieces
  3. Color papers - A4 size - 24lbs (brights staples)
  4. Balloon ribbon
  5. Pencil
  6. Marker
  7. Scissors
  8. Templates to cut petals and leaves
  9. Foam for scoring leaves.

 A closer look at paper flowers and leaves of different colors, variety and sizes that I had made through out the setting.

Hope you liked the decor. Thanks for stopping by. Ta-Ta !!
post signature

August 21, 2015

Quality Of Life

It has been a while since I came up with a comic strip. My latest Huion 610 pro and a funny, but thinkable, blog on quality of life by my brother-in-law Raghu, have inspired me to come up with this comic. Refer my BIL's blog - Antharanagam

Readers, please excuse as this comic is written in my mother tongue Telugu.


Hope you enjoyed this little attempt. Thanks for stopping by.

post signature

August 13, 2015

My favourite artist.


Recently I was recently reminded of Artist Appreciation Month by Patience Brewster, a designer of handmade Christmas ornaments and gifts and so I was prompted to consider who has been my inspiration.  Kristina Werner, or popular as starofmay, is my first inspiration for making greeting cards.

3 years ago, I wanted to make a beautiful handmade card for my husband, which is when I came across Kristina’s channel on youtube. I loved her videos and the way she showed step by step process of making cards, various tools she had used and the perfection with which she finished off a handmade card, have all motivated me. I challenged myself if I can make such cards and implement my ideas with perfection. And that’s how my card making journey had began. I am also inspired by Jennifermcguire, Gayatri Murali, Sanketi, Aga, and the list goes on and on. There were many artists out there; however Kristina Werner has always been on top of my list.

It’s a wonderful world of card making that I was introduced to. I love everything about it. The colours, the variety of papers, wide range of tools, stamps and techniques. It isn’t time-taking when compared to the other form of art that I work on, like sketching, painting and different forms of designing. This is an advantage I have with cardmaking.

Thank you Patience for reminding me about the Artist Appreciation month. You are the reason, I have this post up today.

Thanks for stopping by readers.

post signature

July 12, 2015

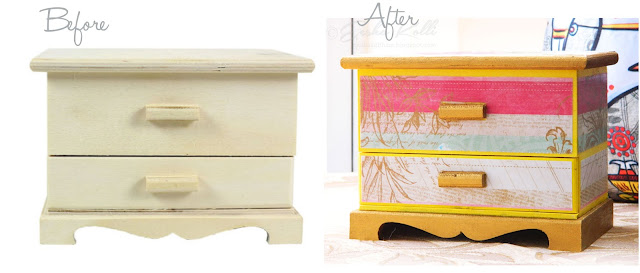
Jewelry Box - Mod podged

Hi all. I have tried something for the first time, which I have wanted to for a long time. :-) I too have modpodged and I loved it!. Alright, so here is a before and after of the box. Ta-Da!


Below is the list of materials that I have used for making this box.
  1. ArtMinds wooden box base (can be purchased here.)
  2. Modpodge - Gloss-Luster
  3. Rub and Buff - Grecian Gold 
  4. Paint brushes
  5. Arcylic paints of your choice
  6. Pattern paper of your choice
  7. Water
  8. Modpodge Clear acrylic Sealer
  9. Paper trimmer
  10. Scissors
  11. Exacto Knife
  12. Measuring tape
  13. Clear tape
The Process

Colour the whole box and its interiors with an acrylic colour that matches your pattern paper and allow it to dry for an hour. This will be the base over which we start of adding layers.


Later trim the pattern paper of your choice with trimmer and scissors, according to the measurements of the box. Only the exteriors of the box may be covered with the paper. The thinner the paper the better for modpodge.


Cover all sides of the box with pattern paper and apply modpodge thoroughly and carefully, without tearing the paper. Allow the first coat of modpodge to dry before doing the 2nd coat. Any air bubbles may be punctured with a needle and the paper will flatten out. Add another coat of modpodge if necessary.


Apply sealant all over the box and finish it off by painting the knobs and border in gold or a colour of your choice. 

Tips

The trickiest part for me was with cutting the paper around the knobs. I had used an exacto knife to precisely cut the paper around the knobs carefully, by measuring the knob size.

I had always used a clear tape around the edges, to avoid the gold paint from smudging. This gave me a crisp finish with the gold paint.


I have been using this box for a month, where I have put all my favorite  fancy jewelry in.

Hope you liked this box. Thanks for stopping by.

post signature